Howdy, Jigglers! Today I'd like to present a Jell-O recipe, the Peach and Banana Mold, that really highlights two of the most basic yet appealing aspects of gelatin desserts (or fruit salads, if you want to be generous): thrift and clarity.
As you can see, there's just about nothing to this recipe in terms of ingredients to buy. In fact, I made this recipe essentially for free, as I had lime Jell-O and a can of peaches on hand, and a friend of mine gave me a banana out of the blue one day. Of course, that prompted me to furiously scan the pages of The Joys of Jell-O to look for something I could easily make with it, and that's how I decided to make this recipe in the first place.
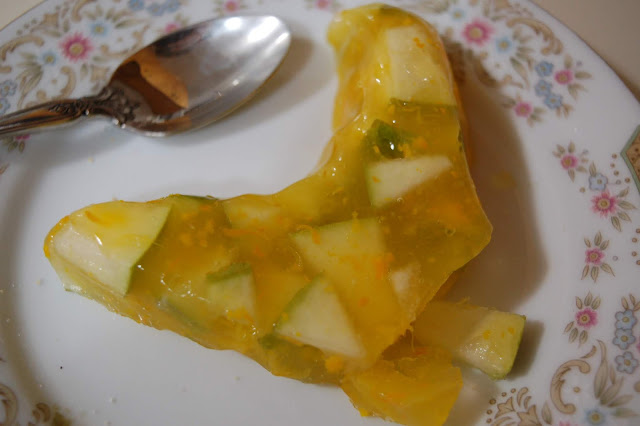
The method involved in creating this dish is truly basic as well. The hardest part, I suppose, was evenly distributing the peach and banana slices in the gelatin since I was using a mold that is thin in places. With most kinds of molds, this wouldn't be an issue, however.
The final product turned out very aesthetically pleasing too. One problem that a lot of these vintage Jell-O recipes have is that they are very often so full of different ingredients that the final dish looks cluttered and busy. My next post will be on a recipe that makes that work in its favor, but most of the time it detracts from the appearance. This recipe, though, has just enough fruit mixed in to provide bold contrast and interest while not making you forget that all the fruit is suspended in a clear gelatin matrix.
Now that's a fruit salad perfect to take to a party pad with shag carpeting! Speaking of bringing dishes to a party, that's another advantage these simple Jell-O recipes offer: when you bring them to a potluck, all the ingredients are easily identifiable. People won't get wary about ingredients they don't like or are allergic to being hidden among all the other mix-ins.
The taste of this dessert is light and refreshing, but certainly not short on flavor. I was a little concerned about the lime flavor not going well with the peaches, but it was very tasty. It might be slightly better with orange-pineapple gelatin, though. Now, Orange-Pineapple is no longer on the Jell-O roster, but you could easily use half a package of Orange and half a package of Pineapple, or you could substitute half the water for (canned or bottled and not fresh) pineapple juice and the other half for fresh-squeezed orange juice and use unflavored gelatin. That flavor combination would make this dish look even better, too. I also like
the idea of serving a garnish of banana slices rolled in nuts--honestly
that would make a very light dessert on its own--though it sort of
negates the make-ahead possibilities of this mold.

At any rate, this recipe doesn't try to reinvent the wheel in any way, but its simplicity is precisely what makes it so great. I do understand why there aren't tons and tons of recipes like this in General Foods's cookbook, since it is basically just "mix and match Jell-O flavors and different fruits," but it's nice to have a few examples of successful combinations of this kind included. You never know when, like me, you might end up with some ripe fruit and no clue what to do with it, and for times like that, the Peach and Banana Mold will serve you well.
Howdy, Jigglers! For the first time ever, I think, I am presenting to you a JOJ recipe that includes no gelatin whatsoever.
The other week I got a powerful hankering for my grandmother's lemon icebox pie, but I had a whole box of graham crackers in the cabinet and a whole box of butter in the refrigerator, so I didn't see any point in buying a pre-made crust. Then, all of a sudden, it hit me that JOJ has a crumb crust recipe in it! It was perfect--I could get my sugar fix, my nostalgia, and knock out a Jell-O recipe all in one go!
This recipe is incredibly simple, although when I was making it, the crust seemed to turn out really thin in my 8-inch pie plate, so I added more crumbs and butter until it appeared sturdier. I did opt to bake the crust before letting it cool and adding my lemon icebox filling.
I may have gone just a bit far in adding more crust material, since it ended up really thick, but I'd rather it be too thick than too thin and falling apart. That said, it tasted just fine and served its purpose perfectly.
To make this slightly more gelatin-related, I did an experiment with the lemon icebox pie. My grandmother and my mother make their lemon icebox pies perfectly every time, using only egg yolks to make them set. I have had a couple of occasions where mine don't set up fully, though, but luckily I have a pie-setting superweapon at my disposal: gelatin. So I added a tablespoon of gelatin to the mixture, and it did, in fact, set up great without affecting the taste at all. In the future, I would probably only use two teaspoons of gelatin for a slightly softer pie, but that's up to each person's preference, of course.

The other thing I want to go over in this recipe is all of the variations suggested. Graham crackers are the obvious choice for most pies needing a crumb crust, but I like thinking about the possible uses of the other cookies listed. I didn't even know what zweiback was before writing this post--for those who don't know, it's a sweetened, egg-based, twice-baked toast that sometimes has cinnamon on top. That seems like it would work well with an eggnog pie around the holidays. The chocolate wafers beg for either a chocolate cream pie or a grasshopper pie. I think gingersnaps would make a perfect crust to give flair to a coconut cream pie. Vanilla wafers or shortbread would make a decadent addition to a banana cream pie.
Though this recipe is anything but revolutionary, it is a good trick to have tucked up your sleeve for all sorts of pies--Jell-O-related or not. So thanks, General Foods, for a completely functional recipe with a few fun twists.
Howdy, Jigglers! As promised, this is Part II of my Easter Special where we look at two fun, creative Jell-O recipes from 1964 that can combine to form the ultimate Megazord of Easter desserts: gelatin Easter eggs in a nest of gelatin-flavored coconut. Last time we explored the Tinted Coconut, but this post is all about the Easter eggs, with a few more detailed technical Jell-O method explanations, and how the two recipes come together.
Yeah, I don't think of fluorescent, bouncy eggs when I think of Easter either, but since it was Easter during coronavirus lockdown, there wasn't much else to do, so I decided to give it a shot. These eggs would best be done with a variety of Jell-O flavors, especially lighter-colored ones like lemon or orange, but I went with strawberry since it's such a spring-appropriate flavor.
This recipe initially made me a little...nervous. First of all, I have never "blown out" the innards of an egg before, but even worse, the recipe mentions nothing about cooking the eggshells before pouring the gelatin into them. I know Americans can be a little paranoid about egg safety, but I really didn't want to take any risks, so I boiled the empty shells for six or seven minutes before using them. If you wanted to avoid real egg shells altogether, you could easily modify a plastic Easter egg for molding purposes.
For reference, I left the narrow (or "top") end of the egg completely closed and opened a 3/4" aperture in the bottom, wider end. This allowed me to kind of poke a finger into the egg to loosen the white and yolk from the shell to extract them. I figured it was better to leave the top end intact since that's the one that you're going to pay more attention to, so you want it to be as smooth and rounded as possible. It turns out that I was a bit mistaken on this point. But we'll get back to that later.
Other than preparing the eggs, this recipe is about as standard as it can be. To make sure that the eggs were plenty firm, I added an extra tablespoon of unflavored gelatin to the Jell-O. I used a funnel to get the Jell-O into the eggs, and stood them up in a tiny saucepan so that they would stay upright. I didn't want to use the egg carton for this because the exterior of the eggs is what can carry pathogens, and even though the eggs had been sterilized, putting them back into the carton and later breaking open the shells could lead to said pathogens getting onto the Jell-O. Jell-O is great, but throwing it up is not, so I made do sans egg carton. If you had a cardboard egg carton, you could probably bake the carton for a bit to make it safe to use for molding, however.
I know it looks like these eggs have suffered some serious wounds, but I promise no eggs were harmed in the making of this Jell-O other than in the way they are normally harmed!
There was just a bit of Jell-O mixture left over after filling eight eggs, so I did this with our cool Beretta-themed ice cube tray. They didn't unmold very well, unfortunately, but it was worth a shot.
After setting up nice and firm, I went about the daunting task of unmolding the eggs. Surely it can't be any different than peeling a hard-boiled egg, right? Well, I dipped each egg into warm water for several seconds, but afterwards I found it very difficult to keep the eggs from ripping apart at the edges during the unmolding. It seems like I needed even more gelatin than what I added. I also believe it would be very helpful to spray the inside of each egg with cooking spray before adding the Jell-O, as well as to allow the gelatin mixture to thicken up just slightly before adding it to the shells, though not so much to where it would struggle to get through the funnel.

These are easily the nicest-looking eggs I got out of the deal, though they aren't perfect, but all of them had a slight white patch at the top. This would be one advantage of molding the eggs right side up: the white patch would, I'm guessing, stay at the bottom of the egg. I have no idea what that is or why it's there, though. It was actually embedded in the gelatin of each egg, too, so it couldn't really be removed.
The other advantage of molding the eggs right side up is that it seemed far easier to me to get the parts of the egg near the opening peeled cleanly as compared to the last part of each egg, so if you want the top end of the egg to look smooth, it would probably be easier to start at the top.
There is clearly not much to say about the taste of these eggs. They taste like Jell-O. They do look quite festive, though, especially nestled in the tinted coconut. The other way I served these was in the middle of a circle of the cookies I topped with the coconut. Don't they look nice?
When I constructed this plate, my husband told me that this was the first Jell-O recipe I have made that truly looks fancy, "Like a dessert you'd get at a restaurant that serves multiple-course meals." I think that means I've truly made it as a Jell-O artist.
In terms of criticisms of this recipe, all I have to say is that the eggs should really have been made with a Bavarian-type recipe that would result in a pastel color. Easter eggs that aren't in pastels are just offputting in some small way. It doesn't matter much, but your brain just doesn't recognize that they are for Easter. The addition of some whipped cream, or maybe a little sweetened condensed milk, would do wonders for the aesthetics of the recipe. The other major improvement needed here is, as I mentioned, more gelatin or less water to help the eggs keep their form when peeled.
With those two adjustments made, though, this would really make a fabulous treat for a big group of kids on Easter Sunday, because I have always thought there is something wrong with the fact that pastel-dyed Easter eggs aren't sweet, and this recipe could be the solution to that.
If you were wondering, I used all the eggs from these shells to make a spinach and cheese frittata, which would make a perfect Easter brunch to avoid sugar overload.
Thanks, as always, to General Foods for giving us yet another excuse to inject more Jell-O into our lives!
Howdy, Jigglers! For Easter, being unable to participate in most of the normal Easter festivities due to the current lockdown, I decided to go all out in the one way I could: with Jell-O. So here is the first part of a double header of Eastery Jell-O madness, which is Tinted Coconut. This recipe is a general garnish that can be used on all sorts of desserts like cakes, cookies, donuts--the sky's the limit with coconut, of course.
At the suggestion of the recipe book in another recipe (stay tuned), I wanted to make this to accompany some Jell-O Easter Eggs as a green coconut nest, so I knew I was going to go with the lime flavor. But I also knew that I was not going to actually eat plain flavored coconut by itself, so I decided to make some sort of festive dessert on which to use the coconut. Since my favorite genre of dessert is cookies, I couldn't not make a big batch of cookies for this.
Back to the actual recipe, though. This is easily the simplest, quickest gelatin recipe I have ever even seen. You measure out some Jell-O, you measure out some coconut, then you shake them together in a container. Done.
Though I usually try to make Jell-O recipes as natural and healthy as possible, I couldn't really find any way to do that in this case. How do you add powdered lime flavor or make this recipe work at all without some amount of sugar? Furthermore, how do you add powdered food coloring? For this reason, I just went with normal Jell-O powder, and it was very simple and effective.
Really, there just is not much to say about this recipe. It works. It's versatile. It's easy. So let's talk more about my application of the tinted coconut.
For the cookies, I used the Easy Sugar Cookies recipe on Allrecipes, except I substituted in whole rye flour for about a quarter of the flour because I ran out of the normal flour that I had and knew that non-bulk packages of flour are very scarce around here at the moment. Plus, I always enjoy having a little wholesomeness in what I make, even if the final product is not the most healthy option out there.
The icing recipe I used was the Sugar Cookie Icing recipe at Veggie Balance, which I primarily used because it didn't call for many ingredients. A quick word to the wise about this recipe, though: if you use artifical vanilla, it will probably turn the icing a light brown color, similar to maple icing. For me that worked out fine, but in case that's not what you're after, just be aware.
All of this yielded a whole mess of cookies, and even more icing. I used the rest of the icing on some cinnamon graham crackers, which was delicious. However, I didn't feel that lime-flavored coconut would go well with cinnamon, so I ended up with some leftover coconut for which I have still not found a use.
These cookies turned out very tasty and pretty with just a hint of lime flavor from the coconut and a bit of nuttiness from the rye flour, which suited me just fine together.
Kudos once again to General Foods for coming up with such a simple way to incorporate Jell-O into a fairly fancy-looking dessert garnish. I think the coconut would work great in a number of different applications, but particularly set into frosting as a cake topping. This would be especially well suited, in my estimation, to a pink lemonade cake with raspberry-flavored coconut on the outside.
That about wraps it up for Tinted Coconut, but it will make a reprisal in Part II of the Easter Special!
Howdy, Jigglers! I know it's a bit cliche at this point to bring it up, but with widespread employment loss and quarantine due to coronavirus, I wanted to post a recipe that packs in actual nutrition with minimal, easy-to-find ingredients, so here is Savory Spinach Salad.
I live in a very small town, and it took a while for our grocery stores to show any signs of shortage, but the last time I went, there were very few canned goods and fresh products like dairy, eggs, and fruit. What there was plenty of, however, was canned spinach. I don't think any soul walking around today has a fervent, Popeye-esque love of this vegetable in canned form, but I likewise think that everyone can recognize the nutritional value of these leafy greens in any form, so if shortages are bad in your area, this recipe will actually make them taste like something.

Since I had some frozen spinach on hand, I used that after thawing it and cooking to dry it as much as possible. In place of the Jell-O I used the juice and zest of two large lemons plus unflavored gelatin. The only other thing I changed was the onion. As I've previously mentioned, I have some home-fermented red onions on hand, so I used some of that, finely minced, in place of grated onion. I left in the salt, the vinegar, and the proportions of the ingredients--everything else, in essence, is the same. If you plan on making this salad, please see my recipe notes at the end of this post for some further tweaking recommendations.

This recipe is a snap to make. The only even vaguely difficult part is checking up on the hardening gelatin enough to catch it at the right stage to fold in the vegetables. Gelatin has an uncanny knack of knowing exactly when I'm in a hurry, because whenever I just want to get everything squared away in a mold and on to my next chore, I swear it takes about three times longer for it to set up. At any rate, the Savory Spinach Salad eventually made five salads in my small individual molds, though this depends highly on exactly how much spinach you use.

I know this is not the prettiest recipe--my husband remarked that it looked like I set moss in gelatin and called it a day. But how does it taste? Well, oddly enough, it tastes nothing like spinach. The rest of the ingredients overpower the spinach element entirely. The main flavor is that of acid, and between the lemon juice and the vinegar, it is most similar to sauerkraut in flavor. It is very acidic, to the point that I recommend toning down the lemon juice to the juice of one large lemon or increasing the amount of water by a half cup and increasing the gelatin to match. Even so, you do still get a good hint of onion flavor as well. The whole package is rather refreshing, though the texture definitely has a bit of that stringy processed cooked spinach sensation. As you're chewing, just remember how much Vitamin C you're getting and pretend it actually is sauerkrat and you'll be alright.

As you can see in the recipe, General Foods recommends serving it over lettuce and garnished with mayonnaise and hard-cooked eggs. While I couldn't get ahold of fresh lettuce, I did have mayo and eggs on hand, so I tried it this way, and it is a definite improvement. Both the mayonnaise and the eggs cut down on the acidity and, of course, provide fat and protein, so the whole package winds up being a very filling snack or a light lunch.
I only had the Savory Spinach Salad on hand for four days, but it held up perfectly through all that time. On the whole, this recipe was not as bad as I was expecting, but it wasn't terrific either. If I had plenty of a mild lettuce, though, I would not feel bad about serving it to company as long as I dialed back the lemon juice or vinegar a little and served it with the eggs and mayonnaise. It's not something you will crave, but I can easily commend General Foods for creating a completely virtuous spinach gelatin salad that isn't terrible.
Howdy, Jigglers! Today I bring you a Two-Way Salad recipe that I was very excited for because it stars one of my favorite flavors in all the world: ginger. Enter the Ginger-Upper, a fruity salad dessert with ginger ale, lemon juice, and pears. Okay, maybe I shouldn't be so hard on the categorization of this recipe, because I guess you could serve this as a salad on lettuce and it would be fine with some flavors of Jell-O, but if you make this with strawberry, cherry, or any flavor that includes banana, this will instantly turn into a dessert dessert, guaranteed.
In my case, I thought the citrus and ginger flavors would go great with orange, while still maintaining a semblance of salad-ness, so I used the juice and zest of three Valencia oranges and unflavored gelatin in place of the Jell-O and some of the water. Other than that and adding a bit of lemon zest for good measure, I made this recipe exactly as written.
Last time I made a Jell-O recipe with fresh pears, I used some pears at the peak of ripeness, and they turned brown pretty quickly. So I used this recipe as an opportunity to experiment with fresh pears that were still just slightly hard but not astringent, peel and all.
I really liked how much color the orange juice imparted to this mold, and let me tell you, adding zest contributes a whole new dimension of flavor to citrus gelatin flavored with real juice. The contrast of the green pears looked very nice, too. Tastewise, with the addition of the ginger ale and orange juice, this mold had all the sweetness it needed, and the pears tasted ripe within a day or so. On the whole, this dish was a fresh and tasty salad that was...sadly lacking in gingery zing for a recipe with "ginger" as the first word in the title.
Granted, ginger ale normally has a subdued ginger taste, but it is just barely noticeable mixed with all the citrus and pears, and if you were to used boxed Jell-O, it would be even less apparent. Thus, I recommend that if you want this to have more of a punchy ginger taste, you ought to use ginger beer instead of ginger ale or add a tablespoon or two of grated fresh ginger into the mix. That should do the trick.
The Ginger-Upper held up fairly well in storage, though within three days the pears got slightly brown around the edges of the peel, but that was certainly an improvement over the other time I used fresh pears. Overall, I was quite pleased with how this turned out. It made a good side dish, but I was disappointed with the lack of convincing ginger flavor. With my recommended adjustments, it should turn out much zippier. To be fair, though, I understand that in 1964 it was probably harder to find fresh ginger or ginger beer, so I can excuse General Foods's use of ginger ale. I just can't excuse their insistence on boasting so much about how gingery this is when, in fact, it isn't.
Howdy, Jigglers! Today we are going to take a look at one of the recipes in JOJ that is specifically designed to be molded in a can.
This concept is one of several introduced in the book that make me think "Well, you could do this, but I don't know why that would make you think that you should." While, yes, tin cans are easy to find and will mold your Jell-O into a shape, it will be immediately obvious to the casual observer that the mold is can-shaped, which is about the cheapest-looking presentation I can possibly imagine. In addition, it will be fiddly to cut neatly due to having a rounded bottom, and furthermore most of these recipes do not fit in a can, so you have to make a can mold plus an individual mold or something along those lines, which is a little awkward.
In any case, the recipe had to be made, and I had some canned pineapple on hand, so here is Minted Pineapple. The recipe makes it out to be a relish-type side salad to be served alongside "hearty meats."
To make this recipe the best it could be, I subsistuted the juice of half a lime, one drop of green food coloring, and unflavored gelatin for the Jell-O. I also used the juice from the pineapple can in place of some of the water. Other than that, I followed the recipe to the letter, though you will notice that the pineapple I had on hand was in chunk form and not crushed form, so the texture was slightly different but otherwise the dish was the same. I also chose to make this in a serving bowl for aforementioned reasons. There will come a time when I will mold a Jell-O recipe in a can just to see how it works, but I was too lazy to do so this time. But for those of you who are just dying to see Minted Pineapple molded in a can, here is this photo from the book:

I feel as though, when the General Foods photographers were setting up this shot, they asked "What exactly would be an appropriate garnish for this recipe?" After a few minutes of racking their brains, they came to the conclusion of "We have to pick something just to get this shoot over with--somebody go grab some parsley!" Anyhow, this recipe was very simple to make, and it turned out fairly attractive, and it wound up smelling just slighly of mint. Thankfully, no trace of vinegar could be distinguished.

The taste of this odd combination of ingredients was surprisingly harmonious. The vinegar gets lost in the general tanginess of the pineapple and lime, which is offset by the pineapple's sweetness and the sweet overtone of mint. Despite the inclusion of salt and vinegar, this recipe easily falls into the growing category of savory Jell-O that isn't. If you blindfolded a hundred people that you found walking down the street, had them taste this dish, and asked them what kind of a dish it was, all of them would tell you that it's a fruity dessert. It isn't overpoweringly sweet, but it is a sweet dish.
...Which brings me to my next question I wish I could ask of the General Foods gremlins: what sort of meat was intended to be accompanied by this? If it were just pineapple and lime, I would say Hawaiian-style ham, and if it were just lime and mint I would say pork or lamb roast, but it's all of that. At the end of the day I guess this would work best alongside chicken or potentially white fish, but only because their flavors are so mild. Ironically, these are about the least "hearty" meats I know, but this would definitely not go well with any red meats.

Despite Minted Pineapple's failure as a salad or a relish, I liked it quite a bit on its own. I did not expect mint and pineapple to go well together, but I was wrong. The overall flavor of the recipe was well balanced, too, and it exceeded at one of the nicest abilities of gelatin, which is to make you feel like you are eating something substantial that is, in all reality, very light. It would certainly be nice as a light, fruity dessert at a summer barbeque or any similarly warm occasion.
Though misguided and miscategorized, Minted Pineapple is a tasty and unique variation on the Jell-O theme that I would certainly make again, just not in a can.


