Sunday, September 30, 2018

The Joys of Jell-O Recipe #26: Creamy Freeze

One of the beautiful things about Jell-O is that you can pretty much dress it up with anything you might have on hand, which makes it a thrifty little dessert choice. I had previously bought some lemon Jell-O that I had wanted to use for a fancy Jell-O salad recipe I found out about, but then I realized I didn't want to spend the money on all the different fruits and other fixings that went into it, so in I dove to The Joys of Jell-O to find something nifty that I could make with lemon Jell-O and no money. Enter the Creamy Freeze.


This fairly innovative little recipe uses the binding powers of gelatin and whatever Dream Whip is made of to simulate ice cream by folding the two together, freezing partially, and then whipping more air into the already fluffy mixture to make it light and scoopable once totally frozen. This ends up being easier said than done, though. For one, I have never met anyone who has freezing trays, so I was using a metal mixing bowl and the aluminum pot of a rice cooker to freeze my creamy mixture--maybe that affected the rate of freezing. Either way, it took much longer for the mixture to get even slightly frozen than what the recipe suggests, and I consider my freezer colder than most. I still followed the recipe's guideline about waiting until 1/2" was frozen and everything, but I'm not convinced it turned out exactly as it should have.


The result was less reminiscent of ice cream in texture and more reminiscent of a creamy, finely shredded shaved ice. Now, don't get me wrong: creamy, finely shredded shaved ice is a supremely refreshing dessert, particularly in lemon. It took on a dainty shade of creamy yellow and was just sweet enough to be indulgent without being too rich. Plus, it did manage to be readily scoopable. But it wasn't like ice cream.

Ultimately I can still recommend this recipe as an easy, budget-friendly, solid choice, though it did take a long time to prepare by Jell-O standards. However, if I were to make it again, I would invest in a couple of freezer trays to make sure the surface area-to-volume ratio is sufficient for proper freezing. Plus, there are several other recipes in TJOJ that call for the use of a freezer tray. Apart from that, I would always recommend real whipped cream over Dream Whip, but in this instance I really didn't mind the Dream Whip much because it serves the same purpose and doesn't detract from anything except the cost. However, when I was preparing the Dream Whip, I added real lemon extract instead of vanilla extract (because I only have imitation vanilla at the moment--sad, I know), which I think improved its flavor dramatically. I think even if I were using a different Jell-O flavor, I would still use lemon extract instead of vanilla, unless you have real vanilla.
By the by, any Jell-O flavor would probably be good or at least decent in this dish. Strawberry and orange would probably be especially tasty, or you could use lime to make a Key Lime ice cream treat. Another word of advice: it's best to eat this whole recipe, which makes a large batch, within a couple of days. Prolonged freezing and the temperature fluctuations caused by a freezer's defrost cycle cause this dessert to harden until it eventually becomes a solid block, which is no fun.

One last note: if you look at the example photo from the cookbook, you see that the Jell-O and Dream Whip are marbled in the freezer tray. However, if you read the instructions, you are supposed to whip all of that together until well blended but not melted during the freezing process, meaning that there's no way you can both follow the directions and end up with a recipe looking anything like the photo. Thanks, General Foods.

The Joys of Jell-O Recipe #24: Cherry Cola Mold

Okay, so it's been quite a while since I've posted a Jell-O recipe. Mostly that's due to having bought a house and otherwise staying very busy, but I also just haven't made that many Jell-O recipes. And, sadly, I didn't get pictures of the few I did make, but I'm still going to jot down my thoughts on each one and post the recipes.

The other thing I have started doing differently is making these recipes out of order. Instead of doing them as the book presents them (which would leave me stranded on "savory Jell-O dish" island for quite a while without a break), I've started going in a more-or-less random order based on my husband's recommendations and/or what I have on hand at the moment. Hopefully this will be a little more entertaining to follow along with, as even in the dessert sections, there are lots of consecutive Bavarian and Crown Jewel recipes, so hopefully switching it up will help us all avoid burning out on such repetition.

The first recipe I made was the Cherry Cola Mold. This was chosen by my husband because, frankly, cola and mayonnaise don't seem like the snuggliest of bedfellows. I made this recipe exactly as written, which is easy and straightforward (like most Jell-O recipes), except that I omitted the nuts. Maybe there's a gelatin recipe I would like better with nuts, but up to this point I haven't found it. I also found it very odd that this recipe calls for both cherry and strawberry gelatin. Wouldn't it be more cherry-y with two packages of cherry Jell-O?
As far as the finished product goes, the gelatin takes on a dusty rose color due to the cherry syrup, cola, and dairy ingredients, and it's smooth apart from the chunky ingredients.
The flavor...well, it's okay. It certainly tastes like cherry, with a tanginess provided by the pineapples and mayonnaise. The cola flavor almost entirely gets lost in the mix, while the cream cheese and mayo just make the whole thing so fatty it's almost too rich. Overall, it's merely alright, though I am impressed that you can add mayo, cream cheese, and cola to Jell-O and end up with a dish where none of those ingredients are distinguishable.
If I were General Foods and had the idea for a cherry cola mold, though, I think I could have done better, and maybe someday I will try this and report back on how it works out:
-Take the capacity of your mold, subtract half a cup, then divide by two.
-Take the quantity you came up with in the first step, and bring that much of your favorite cola to a boil--bonus points if it's cherry flavored.
-Dissolve 6 ounces of cherry Jell-O into the boiling cola.
-Take the same amount you calculated again of cold cola and add it to the gelatin mixture.
-Pour gelatin mixture into the mold and let cool until soft-set (or, as official Jell-O parlance would have it, very thick), then stir in half a cup of maraschino cherries, optionally adding a splash of the cherry syrup.
-Chill until firm, then unmold.
-Optional: leave out any maraschino syrup, continue thickening the gelatin until set but not firm, then add a thin layer of the syrup for a colorful layered effect.
While that dish might not be as pretty or Jell-O salad-y, I think it would be more successful at meeting the goal of "Cherry Cola Mold." It would taste like cherries and cola instead of cherries and pineapple. As written, though, this recipe is passable taste-wise, just very confusing. I would not make it again.
Next up: a few recipes I did a while ago, then back to the regularly scheduled "I make one recipe then post about it, with pictures of what it actually looks like" routine.

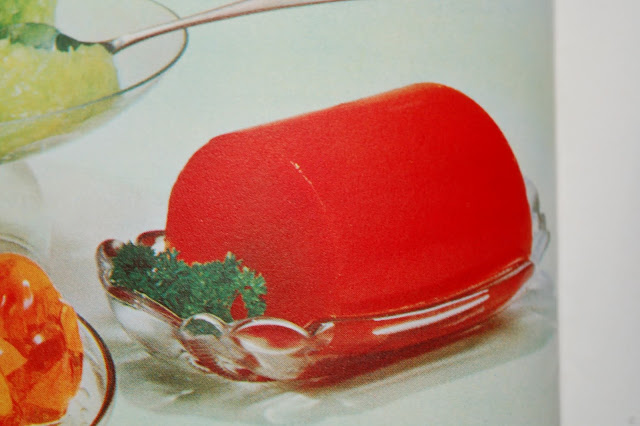
The Joys of Jell-O Recipe #160: Quick Tomato Mold

I'm trying to give all the kooky Jell-O recipes in this odyssey a fair shake, but sometimes it just doesn't shake out. The Quick Tomato Mold is another recipe I made while on a camera and writing hiatus due to being too busy, but I remember it clear as day.


Since Salad Jell-O flavors no longer exist, I used unflavored gelatin as the base for this "salad" and added some Italian herbs to the mix to mimic the Italian salad flavor (in this case parsley, oregano, and a little thyme), but otherwise made it as written. I was sort of excited to make this recipe since I knew that tomato aspics were popular dishes for a while both in the American South and in England, plus I had never really had tomato juice and wanted to use the leftover juice to try a Bloody Mary.

Unfortunately, none of that turned out how I wanted it to. Instead of letting the gelatin set up in a can, which just seems like a cheap-looking way to do it, I divided it up into silicone baking cups, and it had a nice red color and set up very firmly. However, it had the unmistakeable taste of pizza sauce. It really just tasted like hard pizza sauce, perhaps pizza sauce that had been left open in the refrigerator for far too long. The gelatin was so strongly flavored that I started gagging upon eating it and ended up throwing the vast majority of it out after struggling through one cup.

Now, to be fair, maybe this dish would turn out a little differently with some celery juice and celery salt or vegetable stock (to represent the other salad Jell-O flavors) instead of Italian herbs, but I somehow doubt it. It primarily tastes of the tomato juice, and I think tomato juice just isn't for me, especially not in a solid form. But I couldn't finish the Bloody Mary, either. I think you just have to really enjoy the flavor of tomato juice to be able to stomach eating it like solid food.
Another caveat to my dislike of this recipe is that I used a new kind of unflavored gelatin for it, and I believe its lower quality caused the recipe to turn out grittier than it should have. However, I don't think that's what ruined the experience for me.
Regardless, I would overall rate this recipe as very bad for being completely unappealing in every regard except the color, which is firetruck red as advertised.

The Joys of Jell-O Recipe #7: Quick Fruit Dessert

In the reference section of all mid-century Jell-O cookbooks, there is a method described to accelerate the setting of gelatin using ice. I have always thought that the claim that this speed-set method could completely harden gelatin in one hour was a little far-fetched, so I was pleasantly surprised to find that it works like a charm.


To make this simple Jell-O recipe, I just added a package of frozen raspberries to a normal mixture of hot water and raspberry gelatin, and, as claimed, the gelatin was fully set after an hour in the fridge.


As far as taste and appearance go, there's really nothing to say about this "recipe". It tastes like Jell-O with fruit, alrighty, which I guess is a good thing considering that that's what it's going for, but there's nothing more to it than that. In all, I can definitely recommend this recipe for anyone needing to get Jell-O made quick.

Saturday, September 29, 2018

The Joys of Jell-O Recipe #10: Spiced Fruit Cups

Another recipe I made that I failed to get pictures of the end result was Spiced Fruit Cups, which is a fairly good idea. It's essentially just mixed fruit folded into cinnamon-spiked gelatin. Now, General Foods suggests that any fruit flavor can be used, but that didn't sit right with me. Do you really think raspberry and cinnamon would play nice together? Or lemon and cinnamon?


Me either, so I bought a package of a Jell-O flavor that hadn't been invented at the time this recipe was written--peach. Peaches and cinnamon go great together, so that's what I got. Otherwise I made it as written.


The end result was fine, except that the peach flavor seems more than a little artificial, and the cinnamon somehow highlights that fact. The cinnamon also seemed to have a hard time blending into the gelatin, so you encounter clumps of it every so often. But the color was certainly reminiscent of spiced peaches, and the fruit went surprisingly well with the rest of it.

However, if I were to make this recipe again, I would probably use unflavored gelatin and peach nectar with diced peaches in it, as well as add a pinch of nutmeg or cloves to really punch up the spice.

The Joys of Jell-O Recipe #9: Marshmallow Parfaits

One of the great things about gelatin is its phenomenal anti-gravity properties, so I took the opportunity to bring a simple Jell-O dessert recipe, in this case the Marshmallow Parfait, into the space age with the tip-set method.


This recipe seems very basic, since you just make regular Jell-O, top it with whipped Jell-O and marshmallows, and then top that with more regular Jell-O. However, I was feeling up for a challenge when I made these, so I put a couple of portions into wine glasses and set them up in the refrigerator to lean against other objects at an angle so the gelatin would set at that angle.


The end result certainly didn't look like in the pictures, but I did get it to work. I think the tip-set method would work better with an all clear Jell-O dish instead of one using whipped Jell-O, because the fuzzy look of the whipped gelatin obscures the fancy angle a bit. It also probably helps to use a slightly less severe angle than I did here.


On top of that, the layering of the gelatin didn't quite work how it should have. For me, the final layer of clear gelatin just sank down underneath the whipped gelatin and marshmallows, so the triple-layer effect didn't actually happen. Maybe it would have if I had whipped the whipped Jell-O more or added more marshmallows? Not sure on that one.


Regardless, I very much enjoyed this recipe even if it wasn't Instagram worthy, as the kids say. I think the strawberry Jell-O flavor is my favorite flavor to stand on its own so far--in this recipe it's practically on its own, anyway. It really tastes like strawberries and has a good sweetness balance, even with the added marshmallows. Beyond that, the marshmallows just melt to foamy goo in the gelatin, which is nice especially as a contrast to the whipped Jell-O, which is also foamy, just in a different way. On the whole this is a basic but very effective gelatin dessert recipe that I daresay would be good with any flavor of gelatin one could want.

The Joys of Jell-O Recipe #8: Raspberry Chantilly

Here's another recipe I made quite a long time ago, but in this case I actually do have ingredients and results shots in addition to pictures of the recipe itself. Raspberry Chantilly is basically whipped raspberry gelatin mixed in with whipped cream and a little bit of peach jam.

Sorry about these images being sideways, but I tried uploading it at all different angles and it wouldn't go the way I wanted.


Making the recipe is easy enough, except that peach jam is too viscous and sticky to mix in evenly with anything, so it is difficult to distribute the jam even vaguely evenly. Aside from that, though, this dish comes together in a snap and makes quite a lot of fluffy, fruity cream.


However, the end result was a little lacking. Firstly, mixing Jell-O with whipped cream does dilute the intense sweetness of the gelatin, but then adding peach jam takes it back over the top, especially since I tended to bite into big clumps of it infrequently, for the reasons I described above. Secondly, even though I really only added a pinch of salt to the mix, as instructed, the salt was too noticeable in the final product, and I didn't care for that. It certainly was pretty, though!


As I find myself thinking time and again, though, if you would take this basic formula and swap out Jell-O for unflavored gelatin and a tart red juice (perhaps pomegranate or cranberry, if raspberry juice is too expensive or hard to obtain), it would create a nicely balanced, tasty dessert, so I still recommend the recipe with the aforementioned alterations.


Monday, April 30, 2018

The Joys of Jell-O Recipe #6: Pastel Pound Cake

From the beginning, I was excited to make this recipe. Compared to dishes like the Ladyfinger Dessert and the Mint Julep Dessert, a simple fruit-flavored pound cake sounded refreshingly normal.


It's pretty much your basic pound cake recipe, only with a packet of Jell-O thrown in! This came together in a jiffy and made a lovely Bundt cake. It was so lovely, in fact, that when I took it to work I only came home with one leftover piece, which was perfect because I wanted seconds. The only issue with it was that even though I greased my cake pan, a little chunk of the cake ripped off when I dumped the cake out. Maybe I simply need to be more careful or let the cake cool a little more in the pan before trying to remove it.


I used the orange flavor because I hadn't had it in a while and I thought it would go well with the lemon glaze. I made the recipe exactly as written. This recipe has the distinction of being the first (but ceratinly not the last) Jell-O recipe I have encountered that calls for an ingredient with which I am not familiar. I don't know what salad oil was or what its modern equivalent might be, but I figured since canola works in every other cake recipe I know, it would work in this one, and fortunately it did. At some point there may come a time when I truly cannot get ahold of some of the ingredients for these older recipes (like spiced peaches as called for in the 1917 Jell-O cookbook), but luckily that wasn't the case here.


Honestly, there's nothing I would change about this recipe. It's a Good Dessert just the way it is. It's very easy and quick to make, and one of my co-workers thought it tasted so good that he didn't believe me at first when I told him I didn't get it at a bakery. It would probably be good with any Jell-O flavor, with or without the glaze. One note, though: the glaze is quite strongly lemony, and it makes a lot of glaze, so if you are not into lemon drops, you might want to reduce the lemon juice by one-third or just find a different glaze recipe.

So, now the bad news: I lost my photos of the finished cake. It looks golden brown on the outside and pastel orange on the inside with a somewhat moist crumb and a generous dose of glaze. If When I make this cake again, I will grab some photos of it and update this post, just for the sake of completeness.

Sunday, April 15, 2018

The Joys of Jell-O Recipe #5: Mint Julep Dessert

This is the first recipe in JOJ that really worried me. It's the first one that seems, well, a little wacky. While I'm all for mocktails, being a teetotaler myself, I was not convinced that pineapple was the right choice of flavor to substitute for bourbon, and I certainly was not convinced that such a sophisticated cocktail like a mint julep really needed a whipped-cream-and-cherry topping.


But I went ahead regardless, making just a few changes to make the flavors better. Instead of lime Jell-O, I used unflavored gelatin and the juice of two limes (I like things really limey), or about a quarter cup of lime juice. Instead of mint and peppermint extracts, I simmered several fresh mint sprigs* in the water, then steeped more crushed mint in the gelatin mixture once everything was put together. As per the recipe, I did use the pineapple syrup from the can of pineapple rings, but since I was not using a boxed gelatin mix, I added two extra tablespoons of sugar to the mix. Once again I used a whipped cream stabilized with two tablespoons of powdered sugar, piped on top of the gelatin with a sandwich bag with a corner cut out. Lastly, I added one drop of green food coloring to the final mixture because it looked a little sickly without it.


The order of operations for me was slightly different than stated in the recipe. I brought half of the water and the sugar to a simmer, added the mint, let it simmer for a few minutes, then took the mint out. Meanwhile, I mixed the pineapple juice and the rest of the water, let the gelatin bloom in that, and juiced the limes. Once the mint concoction was done, I poured the two mixtures into a bowl and added the lime juice and food coloring. At that point I did a taste test, which I highly recommend, and decided to add more mint. After letting that all steep until it had come to room temperature, I strained out the mint and let the gelatin set up in the refrigerator.

Gelatin looks all sparkly when it's blooming.

This was also the first recipe I have encountered to use the flaked gelatin technique. The idea is that you set up the gelatin like normal until it's completely firm, then run a fork through it a few times to create a flaked texture. Maybe I just wasn't using a very good fork for the purpose or something, but for me it ended up being more granular than flaky, but it did create a new and more interesting texture to the dessert, and breaking it up into little pieces like that does let the gelatin stretch further, which is always nice.
All told, this is my favorite recipe from the book so far, despite my initial skepticism. The lime-pineapple-mint flavor actually works really well, and when piled in with the pineapple and whipped cream, it's simply mouthwatering. The gelatin itself turned out far less sweet than I anticipated, but the flavors were lovely, and the dish was plenty sweet enough for me when mixed with the cream. I would not say that this is an authentic replica of a mint julep by any means, but it is refreshing and different.


Furthermore, the mint julep dessert is incredibly pretty, especially when in an old-fashioned sundae glass like this. Even if you completely restructured the flavors to be more tropical, like omitting the mint and subbing in coconut water for the water, which actually sounds really good, this arrangement looks like a little slice of paradise in a glass. I bet this would also be attractive in an old fashioned glass (the cocktail, not the vintage).
For me, the way I prepared this dish was the ideal way to do it, and a genuinely good dessert, minus one caveat: the gelatin itself. In my experience, if you do not flavor your gelatin mixture enough and you use Knox gelatin, you are left with a gross musty flavor. I thought that with all the extra mint, and all the pineapple juice, and all the lime juice, and all the extra sugar, I would not be able to taste this mustiness. For the most part, I was correct; however, if I got a bite of pure gelatin and was looking for it, I did notice it a bit. I think that if I had used beef gelatin, this would not have been an issue, so that would be my only recommendation on how to change my formula. However, if you like things sweet, I might increase the added sugar to four tablespoons. Perhaps that alone would be enough to cover up the Knox flavor. Also, if you are not a big lime fan, you could easily get by with the juice of one lime for a more subtle citrus flavor.

I thought that since mint is a relative of catnip, my cats would chew on this like they try to chew on all my other plants, but they actually have less than no interest in it.

*If you do not have a mint plant growing, I strongly recommend buying a pack of fresh mint sprigs at the grocery store, rooting one in a glass of water, then planting it in a pot and putting it in a windowsill. Mint grows like crazy--honestly you don't want it growing outside--and does not seem to mind indoor life whatsoever. Plus, it's completely safe to have around curious pets and is fantastic to add to teas/baths/cocktails/water/etc.

Wednesday, April 11, 2018

The Joys of Jell-O Recipe #4: Cardinal Pear Mold

One of my favorite aspects of gelatin is its budget friendliness, and the Cardinal Pear Mold is the first recipe in JOJ that specifically appeals to its low-cost appeal. It's another simple recipe consisting of a spiced cherry gelatin served with canned pear halves to "glamorize" them, even though the pears are not incorporated into the gelatin in any way. That's a little like saying that serving some bread, meat, and vegetables is automatically a sandwich, but there it is.


At any rate, I took the pains to actually glamorize the pear halves a little bit, but honestly it was more out of necesity than sense of style. You see, I'm the only gelatin eater in my household, so I knew it would take me a while to eat all of this, and canned fruit has a tendency to spoil quickly once opened. So I submerged the pears in the gelatin as it cooled, which ended up looking rather nice and taking advantage of the other reason why gelatin is so budget friendly, which is that it preserves foods that are set in it.


The recipe called for individual molds to set the Cardinal Pear Mold in (okay, I get it, cardinals are red, but typically "cardinal" is not used as an adjective meaning "red"), but I couldn't justify spending money on individual Jell-O molds, so I used a serving suggestion I read about somewhere in one of these old cookbooks and just let it set in some pretty teacups.


I did use real-life brand-name Jell-O for this recipe (in the Black Cherry flavor), mostly to test a hypothesis. Something I noticed about the last few recipes I have made with Jell-O and thought were too sweet and intense was that they all had some additional sugar and/or fat in them (corn syrup, evaporated milk, etc). I thought maybe these flavor enhancers were why I found the vintage recipes so overly sweet--that is to say, that the Jell-O formulation of yesteryear was less sweet, with the notion that it was going to be dolled up with other flavors, as it often was in those days. As time went on, the average American wanted more convenience and simplicity in their desserts and started eating the jiggly stuff plain more often, so they wanted it sweeter, meaning that if you did spruce it up with juices or dairy, it would wind up a little overboard with flavor.


However, I found that even jazzed up with only minced ginger (I had some in the freezer and didn't want to buy a whole container of ground ginger for one recipe), canned pear syrup (okay, so this isn't the best test ever--I'll do a better version of this experiment someday) and orange zest, the gelatin was still too sweet. I still imagine that it was less sweet back in the day, which would make these sorts of recipe additions perfectly appropriate.


All told, the Cardinal Pear Mold still turned out well, and was very economical, as advertised. I still think the true ideal version of this dish would be made with natural cherry juice and unflavored gelatin, but honestly there's not anything else I would change. This is a refreshing, healthy dessert, and I can easily recommend it. The only other caveat I would mention is that the recipe says that it serves four, and maybe it does in individual molds, but in a pretty large teacup, it serves six, and if you skimped a little bit you could stretch it to seven.

Sunday, April 1, 2018

Joys of Jell-O Recipe #3: Ladyfinger Dessert

Since the first time I read this recipe, I approached it with a mix of excitement and doubt. As much as these cookbooks talk up whipped Jell-O, I wasn't sure how well it would work as a gelatin variant, especially with a ladyfinger crust. There are ladyfingers all over this book, but the idea just doesn't make a lot of sense initially (particularly to me, since I'm not that fond of them to begin with). I also wondered before making it why I had made the Pastel Pie with cherry Jell-O when the next two recipes are cherry-flavored as well. Guess I'll get my cherry gelatin fix in for the next 50 years.

So I gathered all the ingredients together as instructed, except that I used black cherry juice and unflavored gelatin instead of Jell-O. Now, a quick word about juice ratios: in the not-too-distant past, I made a grape gelatin with grape juice, substituting the juice for 1/4 of the water that one would normally use. With grape juice, that worked just fine and I had a fruity, purple gelatin. Since cherry juice is a little less strong, I used half juice and half water. In the future, I would recommend using 100% juice for the best-tasting results, though, again, if using a very pungent juice you can get away with less.

This recipe is fairly simple and I made it as instructed, down to the maraschino cherries and almond extract. But it's time for a confession: I don't have a pie dish, and I couldn't even be bothered to buy a disposable aluminum one, so I just put this in a 8x8" ceramic casserole dish. This dish probably has more area, perimeter, and depth than your average pie plate, so the layers wound up being thinner than they probably would in a pie tin. Also, I needed more ladyfingers to surround the filling than you would with a pie plate. However, what I noticed was that the whipped part of the filling came very close to filling the dish regardless, so I suspect you would have leftover whipped gelatin if using a pie plate.

Since there was no specific special occasion that would lend itself to a whipped cream decoration for this dish, I deferred to my husband's suggestion of drawing a panda out of whipped cream. I did this with a humble zipper sandwich bag, and I was happy with the results as I'm not much of an artist. I believe, though, that if you cut a very small corner off of a sandwich bag, you could pipe out some fairly nice lettering, like "Congrats," "I <3 U," or "Happy New Year" or something like that. Side note on the whipped cream: I stabilized my whipped cream with two tablespoons of powdered sugar, and it did hold its shape well the entire five-day period that this dish lasted, but you can also use a little bit of gelatin to achieve the same effect.


So, how did the Ladyfinger Dessert turn out? Well, I thought. The pure gelatin layer tasted like normal gelatin, although I much prefer real juice flavoring to the box mix flavoring. The ladyfinger "crust" really surprised me--after hanging out with the gelatin, the cookies soften, resulting in an angel food cake-like texture, which works very well with the rest of the flavors. The almond extract adds a touch of class to the whole affair, and the whipped cream adds a nice flavor contrast, breaking up the cherry overload. If making this again, I would omit the coconut, as it doesn't add much except a little sugar and fat. However, the maraschino cherries provided nice strong bursts of flavor, though I might prefer to have them sprinkled over the top of the dish to add more color as well (and so as not to startle anyone who didn't realize they were there and expected pure gelatin).

But the real question is, of course, the whipped gelatin. As it turns out, when whipped, gelatin takes on a foamy, spongy texture. It's like you took the head off of a freshly poured soda or beer and hardened it just slightly so the bubbles wouldn't go away. As you would expect from that analogy, the flavor is much less pronounced in the whipped layer, but it certainly still comes through. If using Jell-O, I imagine the whipped layer would be slightly pinkish, but with black cherry juice, it ended up an interesting Victorian mauve, which I quite liked.

 
All in all, the Ladyfinger Dessert is a good idea that just needs a couple of minor tweaks to make an officially Good Dessert. I think it would make a particularly fitting treat for after a light lunch or tea with friends, as it won't weigh you down if you plan on doing something after eating it, even if you eat a good deal of it. And I'll go ahead and say it: kudos to the General Foods team (or whoever first thought of it) for thinking to put ladyfingers in gelatin, because it's honestly really nice.

Sunday, March 25, 2018

Joys of Jell-O Recipe #2: Pastel Pie (aka Pepto Pie)

Okay, so if you are following along with this project at home (though I hope you aren't), you will notice that the Pastel Dessert is not the first recipe in Joys of Jell-O. The Hawaiian Dessert is. Well, I'm not making that first because I don't currently have a blender or anything that could suffice for ice-crushing purposes, so I'm going to skip that one until I do.

In the meantime, here's the second recipe from the book, Pastel Dessert. It is a very simple dessert wherein you mix a package of flavored gelatin, a package of vanilla pudding mix, and whipped cream. A fun variation attached is to spread the resulting mixture into a baked pie shell, which is exactly what I did. For all of the recipes in these books that have optional variations, I'm going to make the version that seems most appealing and call it a day--otherwise I'd need to make the same recipe various times, and that's just not going to happen. But I enjoyed the idea of a creamy pink pie, so I grabbed an envelope of cherry Jell-O and a frozen par-baked pie crust and dove right in.


As the recipe would suggest, this is an easy dessert to make, which is something I like about gelatin: you can make tasty, light, and often impressive dishes with relatively little time or effort. In the early twentieth century, Jell-O branded itself as the perfect food for newlywed women to cook, with the assumption that said women probably were not yet cooking experts but still had a husband to feed. Even today I think it makes a lot of sense as something for newlyweds, kids, or anyone who's short on time or cash to make.

Anyway, this recipe comes together exactly as the recipe states. The only thing that worried me during the process was when I was mixing the whipped cream and the gelatin mixture, I didn't think they were going to blend entirely. For a while they just sort of marbled, which honestly would make for an attractive dessert as well, but eventually I got a completely uniform...Pepto-Bismol pink.


Now, I knew the pie would be pink--in fact, that's why I chose the cherry flavor, but the red food coloring is potent enough to do this even when diluted with a whole quart's worth of whipped cream. And let me tell you, the flavoring is just as strong. This pie is very sweet and very fake fruity. My tolerance for that sort of thing is high, but the whole time I wished I had made a double batch of filling, using one packet of Jell-O and one packet of unflavored gelatin. However, that would have been enough to feed a platoon, because not only did one batch fill a nine-inch pie shell, but also all these baking cups (plus one that I had already eaten by the time I took this photo)!


After a couple of servings, I got used to the strong flavor and finished off the pie and cups no problem. I guess it didn't hurt that I had some extra whipped cream to pile on top to further dilute the flavor. However, in the future, I would use fresh fruit juice in place of some of the water and one envelope of Knox in place of the Jell-O flavoring (this texture would be especially nice with fresh-squeezed orange juice), though using the boxed pudding mix is a lot faster and cheaper than making homemade vanilla pudding, so for an easy dessert I would probably leave that part as written. Another quick note: if you choose to put some of this filling into a pie crust, the crust will stay crisp for only a day or so after the gelatin sets, so if you don't like mushy pie crust and don't have a crowd to feed right after making this, I recommend setting the gelatin in individual-sized serving dishes and foregoing the crust altogether.

All in all, this recipe is a good idea that would be a fun little dessert with better flavoring. I can particularly imagine a few people coming together and making several batches of this with different juices to make different pastel colors (lime, lemon, blueberry, any red fruit juice, grape) for an Easter celebration at church. If you increased the amount of gelatin you could probably even use a deviled egg platter or plastic Easter eggs to make egg-shaped molds. So I officially declare the Pastel Dessert redeemable.

Saturday, March 24, 2018

Introduction to The Actual Joys of Jell-O: Goals

Gelatin is a fascinating food, and much of the Internet's fascination with it springs from the mid-twentieth century, when Jell-O desserts were king and General Foods (Jell-O's parent company at the time) was trying to push it as a perfect food for any occasion. Many of the results of this era are now looked upon with revulsion and amusement, eschewed for Jell-O shots and simpler, more reasonable dessert recipes.

However, during Jell-O's heyday, there were a number of cookbooks published by General Foods that perfectly highlight the "1. Start with any given foodstuff. 2. Add Jell-O. 3. Profit!" mentality, and that is the topic of this little blog right here. Joys of Jell-O (1962) and The New Joys of Jell-O (1973) are the main ones from that period, and I just happen to have a copy of each. After having read through them, I decided they needed to be preserved digitally for posterity, hence the website.


So, the idea here is to cook all of the 190 recipes from Joys of Jell-O and, if I still feel ambitious about the project after all of that, the 106 recipes from The New Joys of Jell-O. That book is slightly less important, though, because someone has already completed the task of posting and making all of those recipes. Regardless, I would like to get those done to preserve the recipes in a format where the reader doesn't have to scroll past a lot of whining about politics to get to the recipes and the poster's thoughts on them. In addition, at some point I may have other vintage Jell-O cookbooks in my collection, so those might also be on the table at some point, because it's important for future generations to know what life was like back in the day.


Artificial coloring-laced splattering suggests that this cookbook was well used in its day.

Parameters

To make this goal a reality, I am going to make and post the recipes from each book in order (with a couple of exceptions for logistical reasons). (NOTE: I have since abandoned this strategy because having all of the savory dishes come at me at once was not something I wanted to contend with, so they fairly quickly start to go in a random order.) I want to explore the limits of gelatin's feasible applications, but with a couple of stipulations.

Though I love relentlessly mocking things like the desperate corporatism seen in these cookbooks, I really would like all of these recipes to succeed, so my goal is to make each recipe in its ideal form. You see, before making this blog, I had already make two recipes from these books: the marshmallow recipe from TNJOJ and the Pastel Pie from JOJ. What I found from making those recipes exactly as written is that Jell-O seems way too strongly flavored, not to mention artificial-tasting. It's possible that this was not the case when the recipes were devised in the '60s and '70s, but it certainly is today, so I will make changes as needed to test the value of the recipe rather than the gelatin formulation

A good case in point is any savory Jell-O recipe that calls for lemon-flavored gelatin with added vinegar to make it savory-ish. From everything I've read, that doesn't work well at all, so instead of going down that dark road, I will incorporate a flavoring agent that will actually complement the other flavors in the recipe. In many cases this may also mean using unflavored gelatin (e.g. Knox or Vital Proteins) with juice in fruity dessert recipes. Furthermore, after making each recipe, I will make notes of what I would change were I to make it again.

So that's what I'm going for. Of course, any comments and suggestions are welcome, though cooking blogs are a dime a billion, so the odds of anyone reading this is pretty nonexistent. I don't have any particular timeline set for this, though gelatin recipes typically don't take long and I typically cook once a week, so maybe once a week? We'll see.